Blackout, Spray Painting Plastics & Pillar Recovery Info
If you’re viewing this page, you’ve likely already received a quote from us for standard headliner recovery. For customers looking to go a step further with full interior blackouts or pillar recoveries, here’s everything you need to know:
❌ What We Don’t Offer:
- We don’t recover sun visors in fabric/material, however Sun-visors we can still spray paint black instead.
- We don’t offer spray painting of plastics on all makes & models, as we stick to just the common Ford AU BA BF FG, and Holden VX VT VY VZ VE VF WM WN
These Ford/Holden models are supported because:
✅ Parts are readily available, making replacements easy if needed
✅ Plastic materials are more consistent and accept spray paint reliably
✅ Removal and reinstall is straightforward — no complex clips, airbags, or fragile components
✅ We have extensive experience with these models, which lowers the risk of issues
✅ These vehicles use plastics that don’t leach additives, improving long-term paint adhesion
-
❌ For European or specialist vehicles, we do not offer spray painting due to:
-
Plastics often containing additives that can affect paint adhesion or durability
-
Higher risk of paint failure over time
-
Parts being harder to source if an error occurs during the process
-
Complex clips, airbags, or fragile components
-
✅ What We Can Do:
Pillar Recovery (Fabric-Wrapped)
- Most pillars can be rewrapped in fabric to match the headliner
- (some versions of pillars attract a higher cost, eg: VE/VF with the speaker vent that is plastic welded making it time consuming to uninstall & refit)
- Turnaround time: approx. 7 hours (added to headliner job time making it usually a two day job)
- Best results on pillars come from using non-foam-backed Anthracite flat knit fabric (same black used in factory FGX & Holden models)
📸 Important: Please send us photos of your pillar trims before booking. Some styles may require stitching, which we don’t offer.
Full Interior Blackout – 4 Flexible Options
Choose the approach that suits your project and budget best:
🔧 Option 1: Full Component Prep – You Paint, We Reinstall
Ideal for DIYers wanting control over paintwork
✅ You bring the car to us
✅ We remove the headliner, pillars, and trim components
✅ You take them home to spray paint black yourself
✅ Once painted, drop them back to us
✅ We handle the full reinstall
✂️ Option 2: DIY Prep + Fabric Recovery Only
Save money by removing and reinstalling parts yourself
✅ You remove the headliner and/or pillars
✅ Drop them off to us for fabric recovery only
✅ Discount applies – e.g. pillars from $70 → $50 each, depending on style
✅ You handle your own spray painting and reinstall at your own pace
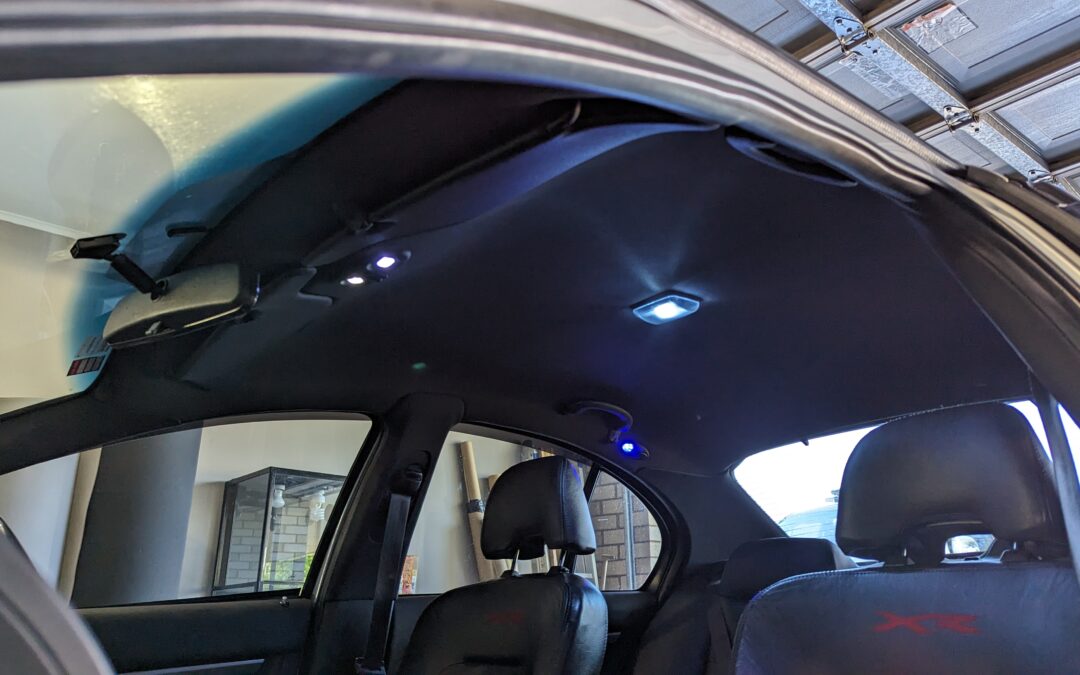
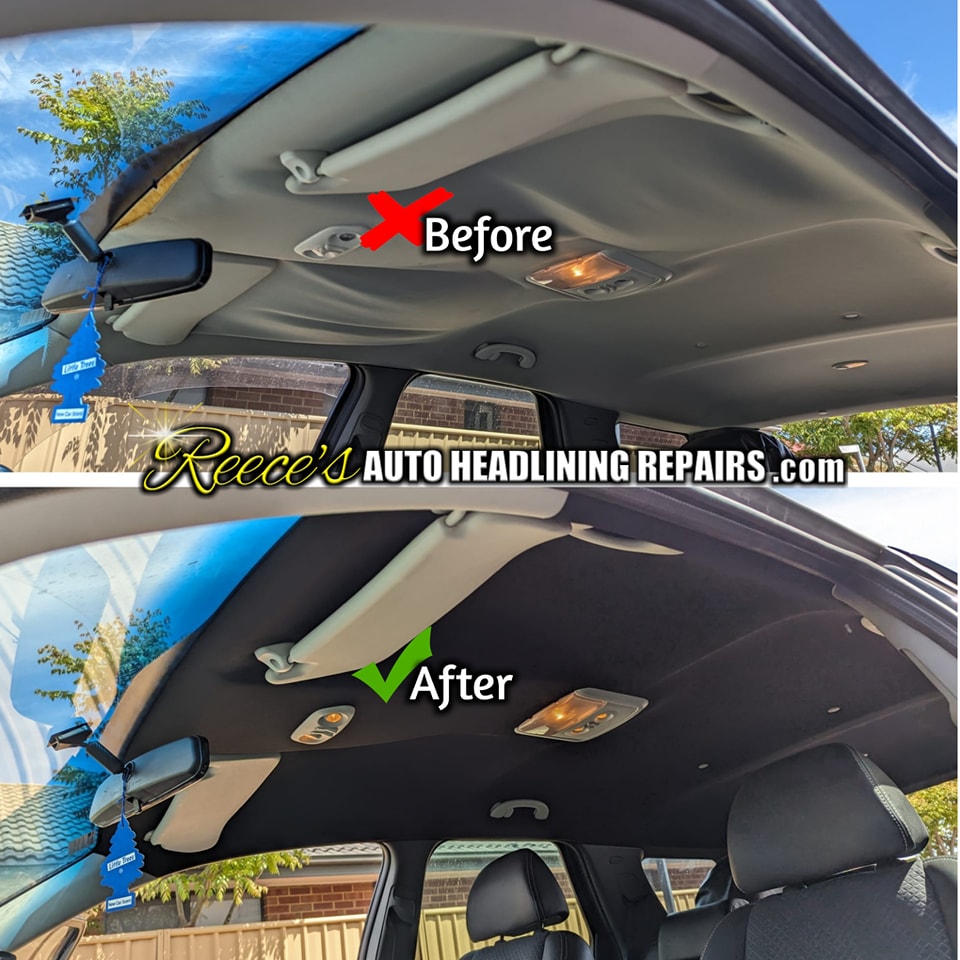
🖤 Option 3: Black Roof Liner Only (Most Popular)
Great upgrade without changing everything
✅ We remove, recover, and reinstall your headliner in black
✅ Pillars and plastic trims remain factory (e.g. grey or beige)
✅ Creates a clean contrast look many customers prefer, and good on the budget.
🔥 Option 4: Full Blackout – We Do It All (Also Popular)
For the full stealth-mode interior
✅ We remove, recover, and reinstall all components
✅ Headliner recovered in black (suede or flat knit)
✅ Pillars recovered or spray painted in black
✅ Remaining roof plastics spray painted black
You can also mix and match – for example, if your headliner is already black and you just want pillars and trims blacked out, we can customise the job accordingly.
⚠️ Fabric Notes for Pillars
- We recommend using our version of a non foam backed #5 Anthracite Flat Knit for pillar recovery — gives a tighter, factory-style finish. More about this style of fabric at the end of the page.
- We often reuse clean, non-foam-backed fabric offcuts from previous roof lining jobs for pillars
- Foam-backed suede, Knits, and Velours is available, but can result in a spongy finish on pillars — not always ideal unless the car allows it
- Our suede has the ability for us to remove the foam, however it’s a time consuming process, so we aim to only do it when necessary, and on certain key areas or pillars.
-
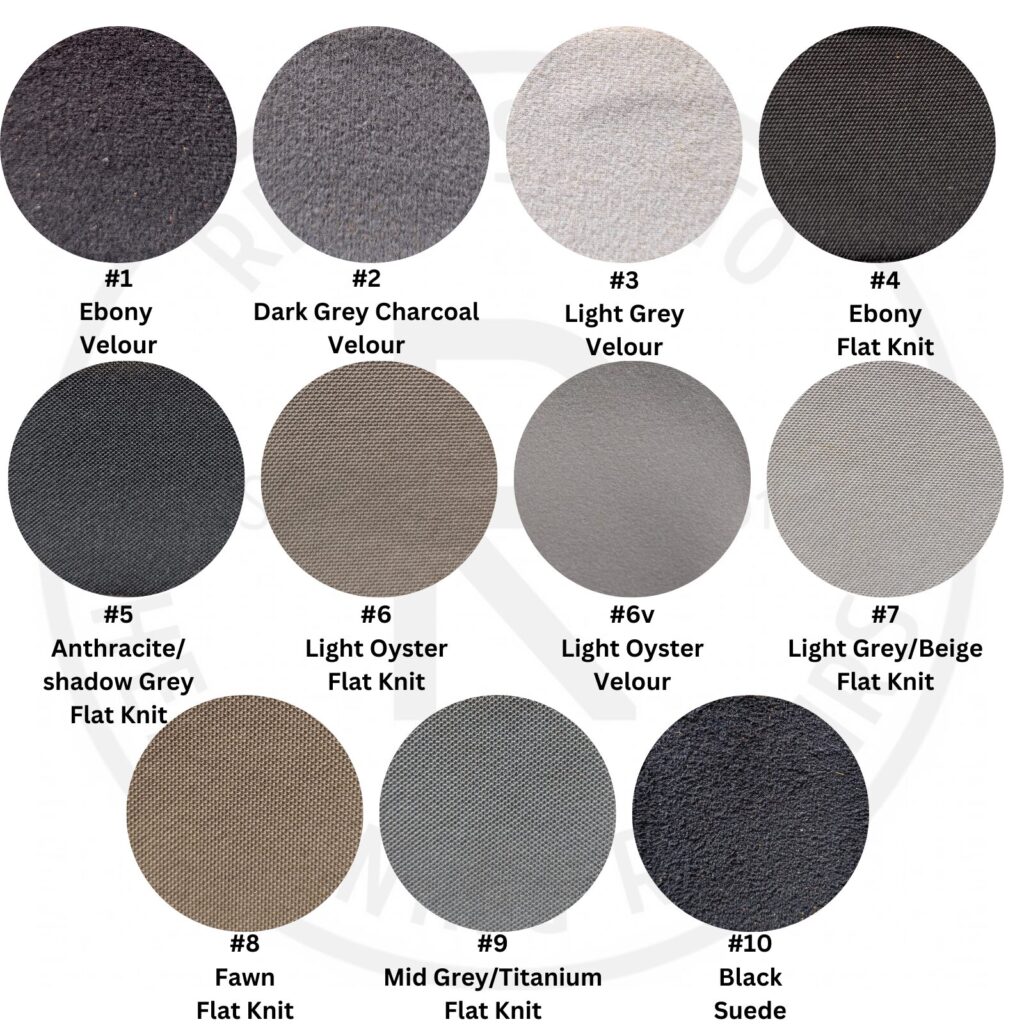
Below is an image showcasing all 11 fabric styles currently in stock. For blackout options, we recommend one of the following:
-
#5 Anthracite Knit
-
#4 Ebony Knit
-
#10 Black Suede
Note on Matching Headliner Material:
Style #4 Ebony Knit or #5 Anthracite, when used on the headliner, closely matches the original black headliner fabric salvaged from previous roof linings. This allows us to reuse that material effectively. By cutting and repurposing it, we can achieve a non-foam finish to the pillars, which results in a clean and cohesive look.This reused headliner material is compatible with both #5 Anthracite Knit and #4 Ebony Knit.
More details about this reuse option are provided further down the page.
-
DIY Spray Painting Plastics – Tips & Caution
While we don’t always offer spray painting as part of your job on specific makes, here’s how we recommend you handle it if you’re choosing to do it yourself:
Step-by-Step Guide:
-
Clean thoroughly using a wax & grease remover
-
Allow to dry completely
- Safety gear, respirator, well vented area, as paint cans are known to be a giver of terrible headaches, and toxic exposure.
-
Apply plastic adhesion primer to any known trouble spots
-
(Optional & at your own risk):
Briefly warm the plastic component & spray can with a heat gun to improve flow
⚠️ Only do this if safe — we take no responsibility. Research it first to see if this option is suitable. Please read our full disclaimer on our main home website before attempting. -
Shake the can well for at least 1–2 minutes (usually creates dents at the bottom of can where the little marble hits, telling you its mixed well)
-
Apply 2–3 light, even coats — do not soak or over-apply
-
Allow proper drying time between coats
Paint Coverage:
-
One can usually covers all roof plastics except pillars
-
Pillars require more due to shape and surface area
- We prefer to use a satin or matte black finish rather than gloss, as it provides a cleaner, more factory-style look.
Using #10 suede Foam Backed Suede on Pillars – Pro Tip
While our foam-backed suede is perfect for headliners, it’s also suitable for pillar recoveries with a few adjustments. In some cases, especially on A-pillars with speaker vents or airbag clips, you may need to gently remove the foam backing to achieve a tight, clean fit. We show this process in detail on our YouTube channel — just search: “Reece’s Auto Headlining Repairs Pillar Fabric Tips”.
🛠 Example: VE Commodore Sedan
-
B & C Pillars – Foam backing stays on for ideal coverage and finish
-
A Pillars (with speaker vents) – We remove all foam backing for a sleeker result and better fitment
-
Around airbag clip mounts, we pinch away the foam locally so clips sit flush without bulging
-
We don’t cut out heater vent holes if attached to pillar, as keeping them covered gives a more modern, minimal finish
Removing the foam for selected pillars takes a little extra time (and will be factored into the quote), but the result is worth it – especially if you’re after a factory-style, clean look across the whole interior.
![]()
Using #5 Anthracite – by salvaging and Reusing Original Anthracite black Headliner Fabric for Pillar Recovery
For our black anthracite headliner recovery jobs, we often salvage and reuse the original fabric removed during the process to recover pillars on future jobs. We only keep the very clean new looking material. This method allows us to provide a tight, non-foam backed finish that perfectly matches the original colour and texture of our #5 Anthracite replacement material for the headliner.
By using this salvaged fabric, we achieve a factory-like, snug fit on the pillars, maintaining the authentic look and feel.
If you prefer, we can also use new fabric from our stock for pillar recovery, which is priced the same. However, this new fabric has a 3-4mm foam backing that cannot be removed on flat knits (only suede yields results), resulting in a slightly cushioned, sponge-like effect on the pillars. This finish may not be ideal for all customers seeking the tightest possible fit.
Full Interior Blackout Service
We usually first send you a quote for just the headliner recovery. Then for additional work like pillars and plastic spray painting, we need to confirm a few things. To provide an accurate quote for a complete blackout, including pillar work and plastic spray painting, please send us:
-
A clear photo of the full interior showing the headliner, lights, and roof components.
-
Individual photos of each pillar: A, B, C & D (and tailgate if applicable).
This helps us assess the scope of work and provide a precise quote. We will then calculate a final total using the relevant prices listed below, tailored specifically to suit your individual vehicle.
Vehicle Type Pricing Summary
-
Ute: $350
- Sedan: $550
-
Wagon: $600
- Sunroof: $350
- European/Specialist: Approx. $550-$1500
Includes removal, recovery in black material, and reinstallation of headliner.
Breakdown of Component Pricing
Headliner
-
$(input price from above) — Headliner removal, recovery in black, and reinstall
-
$10 — Sunroof plastic ‘small’ trim/handle (spray painted)
- $40 — Sunroof plastic ‘Large’ trim/handle (spray painted)
Pillars
-
$420 — Full set of 6 pillars ($70 each)
Recovered in fabric and/or spray painted (based on shape and customer preference)
Individual Pillar Pricing
-
B & C Pillars (x4): $280 total ($70 each)
- Standard ‘A’ Pillars: $140 pair ($70 each), we can confirm via photos usually.
-
A Pillars with Plastic Welded Speaker Vents (x2):
-
$300 total ($150 each)(fabric wrap with prep & vent reattachment, as these have plastic welds to deal with), or
-
$70 each if spray painted instead, or $70 if we just apply fabric straight over the top of the speaker vents.
- We usually wrapped straight over the top, and don’t cut out the little heater vents if fixed and part of the pillar.
-
-
Rear ‘D’ Pillars/Roof Trim (VE/VF Wagon): $210
-
Tailgate Trim (VE/VF Wagon): $210
(Material wrapping or paint depending on shape)
Additional Interior Items ‘Spray Painted’
| Item | Price |
|---|---|
| Sunvisor clips & screws (pair) | $20 |
| Sunvisors (pair) | $150 |
| Sunglasses console | $70 |
| Courtesy lights (x2) | $20 |
| Dualmaps interior light 1 | $50 |
| Dualmaps interior light 2 | $50 |
| Small center dome light | $20 |
| DVD surrounds | $120 |
| Grab handles (x3) | $90 |
| ‘B’ Pillar inners | $20 |
Important Notes
-
Some trims must be spray painted where fabric cannot be applied due to curves/complex shapes (e.g., rear pillars on some ute & wagon models).
-
We do not offer sewn or stitched fabric work (no sewing equipment used).
-
Job completion time: Approximately 2 days (14 hours)
-
Location: Bring your vehicle to us in Munno Para
After you send us clear photos of your interior roof lining and all pillars, we’ll assess the full scope of work and provide a precise quote. The final total will be calculated using the relevant prices listed above, tailored specifically to your vehicle.
VE/VF DVD Screen – Common Issue & Repair Advisory
When performing roof lining repairs on VE and VF models, we are able to remove and refit the headliner without needing to remove or disturb the factory-fitted DVD player screen. However, during this process, we have observed a recurring issue:
Common Issue Identified:
Many VE/VF DVD screens present with broken or cracked swivel mounts at the pivot points of the screen. This damage is typically not visible until the outer plastic surround is removed, as this surround acts as a secondary support mechanism that masks the fault.
Painting Concerns:
In some jobs where a repaint of the DVD screen housing is required (e.g., to match interior trim after a reline), we must handle the screen—specifically opening and closing it—to ensure complete paint coverage. This increases the risk of disturbing pre-existing damage or placing stress on already compromised plastic mounts.
Warranty Policy Reminder:
Due to the age of these vehicles and the known fragility of the DVD screen’s internal plastic components, we do not provide warranty coverage for plastic trim parts or mounts, including:
-
Screen swivel mechanisms
-
Internal DVD housing clips
-
Cosmetic plastic surrounds
Recommendation:
We recommend advising customers upfront about the high likelihood of pre-existing wear or damage to the DVD screen mounts, especially if painting or manipulation of the screen is required. In some cases, replacement parts may no longer be available, and the screen may have to be refitted with care despite minor cosmetic or structural wear.
Important Disclaimer About Spray Painting Plastic Trims
While we take care to properly prep and apply spray paint to interior plastic trims, some areas—especially those subject to frequent rubbing, contact, or movement—may be prone to flaking, scratching, or peeling over time. This is a common limitation with sprayed finishes on plastic surfaces and something to keep in mind when considering spray painting options.
Important Note on Spray Painting Plastic Components:
Please be aware that when plastic parts—especially control buttons with molded logos or printed text—are spray painted (e.g., with black paint), any existing markings may be covered or lost in the process. This is a common drawback of painting plastic surfaces.
If retaining factory text or logos is important for your project, we recommend sourcing factory black plastic components as an alternative to painted ones. Customers are responsible for sourcing any replacement parts if this is the preferred route.
Any deep scratches or surface damage already present on your plastic parts will remain visible even after spray painting. The paint will not fill or hide these imperfections—scratches will still show through, even with a solid black finish.
We’re happy to proceed with spray painting if that’s the finish you’re after—just let us know your preference.